
I’ve been angler for over four decades now and I must say that, when it comes to on-board electronics, the times they are a changing! In the mid 80’s, I can remember being absolutely amazed by the “fish finder” my friend had just installed on his bass boat. I can also remember being absolutely horrified by the price he paid for it. Like most devices in the world of electronics, technology continues to make leaps and bounds forward while prices seem to keep dropping. These trends have put high quality sonar and GPS units right into the kayak fishing market. Instead of the massive head units with poor graphics running on giant batteries from days gone by, we now have compact, super sensitive graphs that have the same technology used to find the Titanic. Now the big question is… which one?
The Right Tool for the Job – Choosing the right graph for your kayak can seem like a daunting task at first because there are a lot of really nice units on the market these days. Your search can be narrowed down pretty quickly by asking yourself a few simple questions. First, “Where do you fish?” and, second “What do you want to see?”. I always ask those two questions to my customers looking at graphs to determine the best unit for their specific needs. Modern electronic graphs usually offer one or more of the following three features: Sonar (traditional fish finder view), GPS (where you are exactly) and Down/Side Scan Imaging (a hyper-active scan of the bottom). All the units available today have sonar and basic models start at under $100.
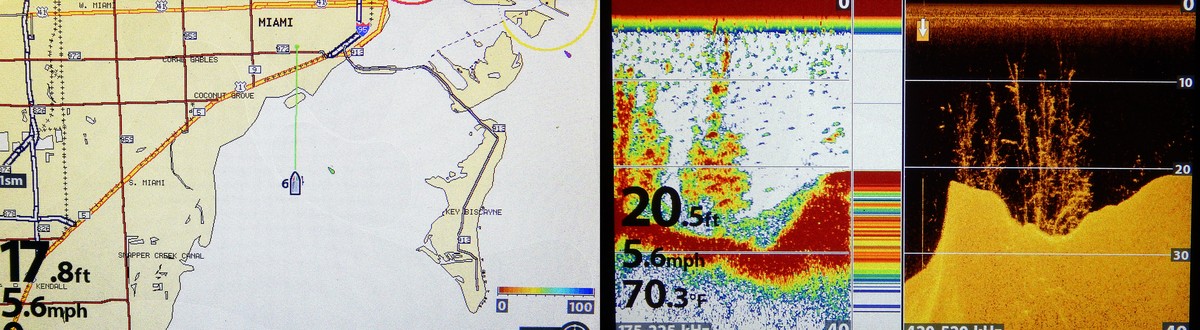
If you fish the ocean at all, then I STRONGLY recommend you choose a unit with GPS. I have fished off the coast of Northern California where the fog had come in behind me and the shore was no longer visible. There was absolutely no way to return to my launch point safely without the GPS in my graph. Secondly, the GPS feature will allow you to mark waypoints of good fishing spots, hazards or anything else that you want to find (or avoid!) on the next trip. Most recently, the introduction of Down and Side Scan Imaging has completely revolutionized how anglers view structure and bottom contour, making them more successful anglers. These features give you the ability to see very clearly not just THAT there is structure on the bottom but exactly WHAT it is. Ask yourself the two questions and you should quickly be able to determine just how much graph you need or want. Oh yeah, one more question…”Will it fit?”
Mounting and Power – Once you have your choices narrowed down, you need to address two very important issues; how you will mount it to your kayak and how you will power it. There are several different companies that make a variety of mounting options for graphs but my personal recommendation would be Ram Mounts products. They have mounts for most of the graphs on the market and they are built solid yet easily adjusted to your liking. The mount I use with my Humminbird Helix 5 allows me to turn and angle the head unit for optimal viewing and to easily remove it for transportation.

Now on to power, probably the most important choice you will make other than your graph itself. A majority of the compact graphs used by kayakers today are powered by 12-volt batteries with at least a 7mA output. These batteries range from sealed lead acid models to the latest (and my personal choice) lithium iron phosphate designs. Lead acid batteries are fairly inexpensive, ranging from $30-100, but they are quite heavy and normally have the minimum amount of power output required. Lithium iron phosphate models, like the units I use from TL Batteries, are half the weight of the lead acid models and can provide more than enough power for even the biggest graphs. These batteries are a bit pricier but the absolute LAST thing you would ever want is for your graph and GPS to go out when you need it most, all because of your battery. In my opinion, this is one piece of the puzzle where skimping is not an option.
Installation 101 – Now comes the fun part! I really do mean that and it’s all thanks to the geniuses at Hobie who designed the Lowrance-Ready scupper and the thru-hull wiring ports. Literally, installation is as easy as figuring out on what side you want your head unit. Even though the scupper that holds the transducer is called Lowrance-Ready, it will accommodate transducers from several other manufacturers such as Humminbird, Raymarine and Garmin with very little modification. Hobie even has an adapter plate available specifically for Humminbird transducers. Running the wires through the hull is fairly self- explanatory but one thing I always do is to coil up and zip tie any extra to keep it out of the way of gear I might stow inside. This will keep the wires from being cut or crimped and hindering the performance of your graph.
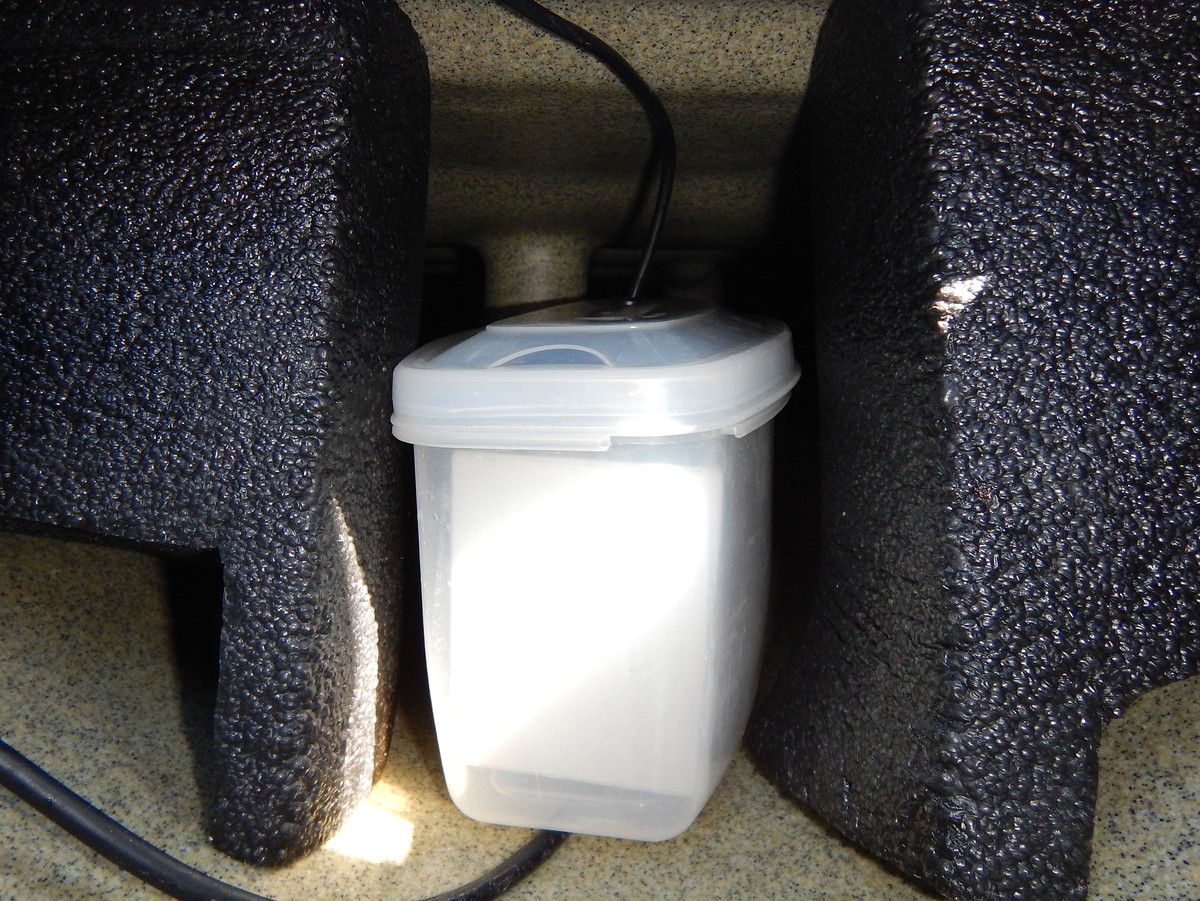
Two important things to remember for your installation are “Nuts and bolts instead of screws whenever possible” and “Keep your battery dry”. Installing your mount to your hull with nuts and bolts will be much more secure than if you use self-tapping screws. There are occasions, however, that there is just now way to reach the inside of the hull and install a nut so self-tapping screws are your next option. As for keeping your battery dry inside the hull, there are several ways you can go. Hobie’s Fish Finder Installation Kit includes a battery holder that fits inside the round hatch, holding the battery up off the bottom of the boat. These work well to keep the battery out of any water already inside the boat but can be troublesome if your hatch leaks. Some batteries come in their own cases and are completely waterproof and can be placed in the hull wherever you see fit. For my own boat and the installations I do for customers, I build a simple battery box that works very well and fits right inside the hull under my seat. As with any installations of anything on your kayak, “measure twice and cut once!”
What’s on the Menu? – One look inside the menu of features and settings on the modern graphs of today could send your brain into absolute dizziness. You can change and customize pretty much everything your graph interprets and displays and it can seem quite overwhelming. The beauty, however, of most of the units on the market today is that you really don’t have to adjust much at all for the unit to give you astounding results! Right out of the box, my Humminbird Helix 5 DI/GPS unit gave me exactly what I wanted to see immediately and navigating through the different screen options was easier than using my cell phone.
RELATED: The Best: Fishfinder Settings for Deep Water
As you fish more and more with your new graph, you will find the two or three screens that you use most and focus on exactly how to read them. Concerned about being able to follow your path back to the launch or other location? Don’t worry! It’s tracked for you automatically. Want to mark a waypoint on a honey hole so you can find it again? Simple as pushing one button! The learning curve on these units is very small to get you up and running quickly. Bottom line is that these new graphs are both very powerful AND easy to use. That’s a great combination that will make your kayak fishing adventures even more incredible.
Check back weekly for new videos and stories by the Hobie Fishing Top Guns.